Table of Contents
How long to boil eggs to Make the Perfect Hard Boil Egg
Introduction
Hard-boiled eggs are a versatile and nutritious addition to any meal. Whether you’re making deviled eggs, egg salad, or simply enjoying them as a snack, getting them just right can make all the difference. Here’s a step-by-step guide to achieving the perfect hard-boiled egg every time.
1. Choose the Right Eggs
Fresh eggs are ideal for boiling, but slightly older eggs are often easier to peel. If you’re looking for easy peeling, opt for eggs that have been in your refrigerator for about a week.
2. Prepare Your Equipment
You’ll need a saucepan, a slotted spoon, and a bowl of ice water. The ice water helps to stop the cooking process and makes peeling easier.
3. Boil the Water
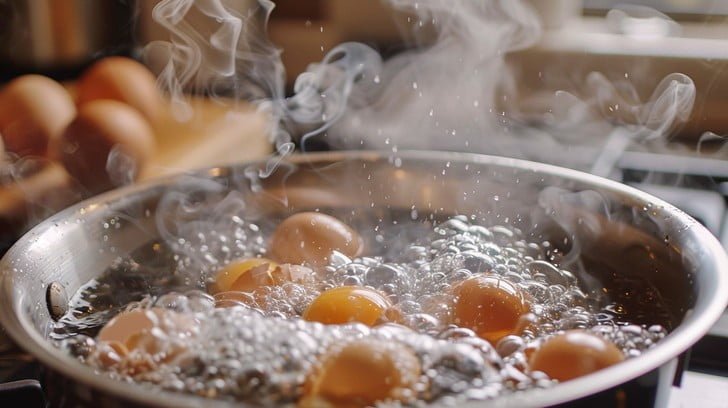
Fill a saucepan with enough water to cover the eggs by about an inch. Bring the water to a rolling boil over medium-high heat.
4. Add the Eggs
Gently lower the eggs into the boiling water using a slotted spoon. Be careful not to crack the eggs. Reduce the heat to a gentle simmer to avoid bouncing eggs.
5. Cook the Eggs
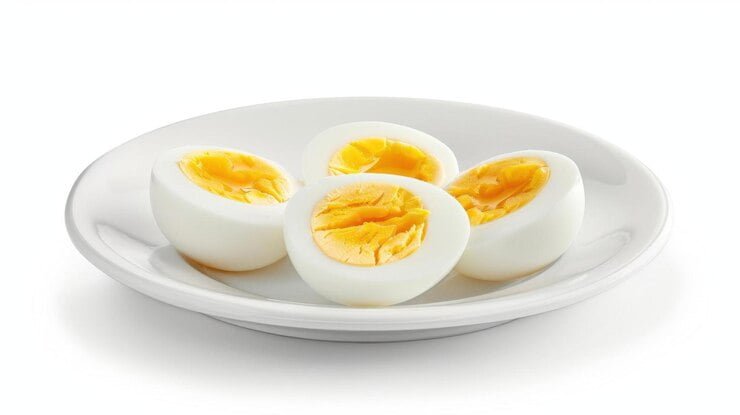
For a perfect hard-boiled egg, cook the eggs for 9-12 minutes. The exact time depends on the size of the eggs and how firm you like the yolks.
- 9 minutes: For a creamy, slightly softer yolk.
- 12 minutes:For a fully set, firm yolk.
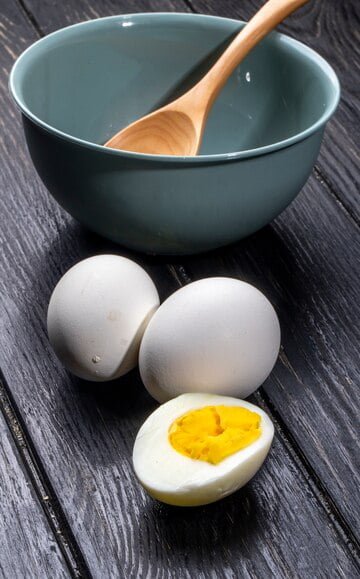
6. Cool the Eggs
Immediately transfer the eggs to the bowl of ice water to cool for at least 5 minutes. This helps to stop the cooking process and makes the eggs easier to peel.
7. Peel the Eggs
Gently tap the eggs on a hard surface to crack the shell. Start peeling from the wider end, where there is usually an air pocket. Rinse under cold water to remove any bits of shell.
How to Make the Perfect Soft-Boiled Egg
Introduction
Soft-boiled eggs are a delightful addition to various dishes, offering a runny yolk with a firm white. They are perfect for breakfast, salads, or as a topping for ramen. Achieving the ideal soft-boiled egg requires precision in timing and technique. Here’s a step-by-step guide to making the perfect soft-boiled egg.
1. Choose the Right Eggs: Use fresh eggs for the best texture and taste. Fresh eggs will give you a cleaner white and a more pronounced runny yolk.
2. Prepare Your Equipment:You’ll need a saucepan, a slotted spoon, and a bowl of ice water to cool the eggs quickly after cooking.
3. Boil the Water: Fill a saucepan with enough water to cover the eggs by about an inch. Bring the water to a rolling boil over medium-high heat.
4. Add the Eggs:Carefully lower the eggs into the boiling water using a slotted spoon to avoid cracking. Once the eggs are in, reduce the heat to a gentle simmer.
5. For perfectly soft-boiled eggs:
- Cooking Time: Boil the eggs for 6-7 minutes. This will give you a firm white with a runny yolk.
- Timing Precision: Start timing once the water returns to a boil after adding the eggs.
6. Cool the soft boil Eggs
Immediately transfer the eggs to a bowl of ice water to stop the cooking process. Let them sit for at least 1-2 minutes to cool down and make peeling easier.
Additional Tips for soft boil eggs:
Altitude Adjustments: If you are at a high altitude, you may need to cook the eggs for an additional minute due to lower boiling temperatures.
Freshness: For the best results, use eggs that are at least a few days old to make peeling easier.
Making the perfect soft-boiled egg is simple with the right technique. By carefully timing the cooking process and cooling the eggs quickly, you can achieve a runny yolk with a firm white, perfect for a variety of dishes. Enjoy experimenting with this delicious and versatile egg preparation!
Are Older Eggs Better for Hard-Boiling?
Introduction
When it comes to hard-boiling eggs, you might have heard that older eggs are preferable. This belief is based on several factors that affect the cooking and peeling process. Here’s an exploration of why older eggs can be better for hard-boiling and how they compare to fresher eggs.
1. The Science Behind Older Eggs
As eggs age, the pH level of the egg white increases. This change in pH reduces the adhesion of the egg white to the eggshell, making older eggs easier to peel after boiling. In contrast, fresh eggs have a lower pH, which makes the egg white more likely to stick to the shell.
2. Benefits of Using Older Eggs for Hard-Boiling
- Easier Peeling:Older eggs generally peel more easily than fresh eggs, reducing the likelihood of leaving behind bits of shell.
- Better Texture: The change in pH can also improve the texture of the egg white, making it less rubbery.
3. How to Use Older Eggs for Best Results
- Storage: Store eggs in the refrigerator until you’re ready to use them. Older eggs that have been stored properly can be used for hard-boiling.
- Cooking Time: Older eggs should be cooked using the same time and method as fresh eggs. The difference in peeling ease is due to the age of the eggs, not the cooking time.
4. When Fresh Eggs Might Be Preferred
- Other Cooking Methods: For recipes where the eggs are not peeled, such as in poaching or frying, fresher eggs may be preferred for better texture and shape.
- Nutritional Considerations: Fresh eggs are slightly higher in certain nutrients, though the difference is minimal.
5. How to Determine the Age of an Egg
If you’re unsure about the age of your eggs, you can perform a simple freshness test:
- Water Test:Place the egg in a bowl of water. Fresh eggs will sink and lay flat on the bottom. Older eggs will start to stand upright or float.
Older eggs are often better for hard-boiling due to their ease of peeling and improved texture. However, both fresh and older eggs can be used effectively depending on your needs. Knowing the benefits of each can help you choose the right eggs for your recipes.
How to Avoid the Green Ring Around the Yolk of a Hard-Boiled Egg
Introduction
A green ring around the yolk of a hard-boiled egg can be an unwanted visual and taste issue. This discoloration, often referred to as a green or grayish-green ring, is caused by a reaction between sulfur in the egg white and iron in the yolk. Fortunately, you can take several steps to avoid this problem and achieve perfectly cooked eggs.
1. Use Fresh Eggs
Older eggs are more prone to developing the green ring because the pH level of the egg white increases over time, which speeds up the sulfur-iron reaction. Using fresh eggs can help minimize this issue.
2. Avoid Overcooking
Overcooking is the primary cause of the green ring. The longer you cook the eggs, the more likely they are to develop this discoloration. Follow these guidelines:
- Cook for 9-12 Minutes: Aim for 9 minutes for a creamy yolk or up to 12 minutes for a firmer yolk.
- Simmer, Don’t Boil:After adding the eggs, reduce the heat to a gentle simmer to avoid a rapid boil that can overcook the eggs.
3. Cool the Eggs Quickly
Rapid cooling helps prevent the green ring from forming by stopping the cooking process promptly.
- Ice Water Bath: As soon as the cooking time is up, transfer the eggs to a bowl of ice water. Let them cool for at least 5 minutes.
4. Peel Under Running Water
Peeling the eggs under running water can help remove any residual shell and prevent any further reaction that might cause discoloration.
5. Use Proper Egg Storage
Store eggs in the refrigerator until you are ready to cook them. This helps maintain their freshness and minimizes the chances of a green ring forming.
6. Avoid Cooking at High Altitudes
At higher altitudes, the boiling point of water is lower, which can lead to uneven cooking. If you’re at a high altitude, you might need to adjust your cooking times accordingly.
By following these tips, you can prevent the green ring around the yolk and ensure your hard-boiled eggs look and taste great. Fresh eggs, careful cooking, and quick cooling are key to achieving the perfect hard-boiled egg every time.
How to Recognize Older and Fresh Eggs
Introduction
Knowing whether an egg is fresh or older can be crucial for various culinary uses. Fresh eggs are typically preferred for certain recipes, while older eggs are often better for hard-boiling. Here are some reliable methods to determine the age of your eggs.
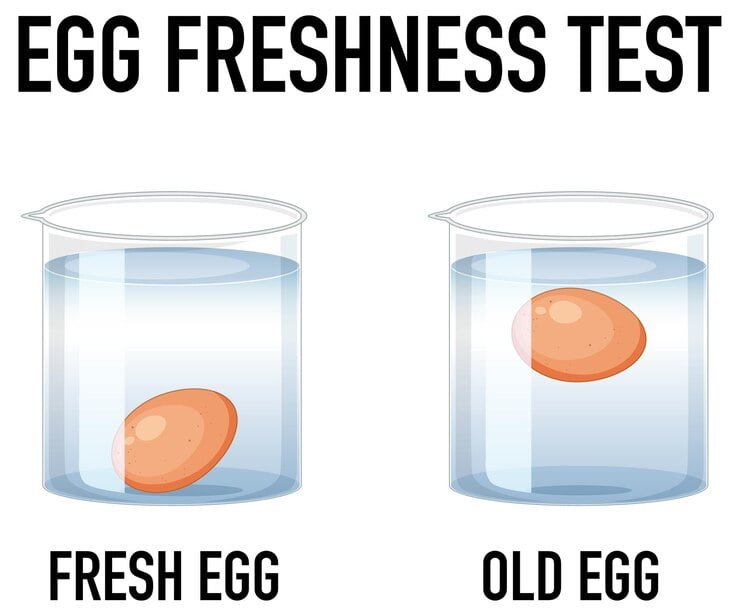
1. Water Test
The water test is a simple and effective way to check the freshness of an egg:
- Fill a Bowl with Water:Use a bowl or large glass of water.
OBSERVE THE EGG:
- Fresh Eggs:Sink to the bottom and lay flat on their side.
- Slightly Older Eggs: Stand upright on the bottom but remain submerged.
- Very Old Eggs: Float to the top. These eggs are best used for non-cooking purposes or discarded.
2. The Smell Test
A strong, unpleasant odor is a clear indicator of spoilage:
- Fresh Eggs:Have little to no smell.
- Older Eggs:May develop a sulfurous or rotten odor, especially if they are spoiled.
3. The Appearance Test
Examining the egg’s appearance can provide clues about its age:
- Fresh Eggs: The egg white (albumen) is thick and cloudy, and the yolk is firm and rounded.
- Older Eggs: The egg white becomes thinner and more translucent, and the yolk may flatten or become more runny.
4. The Shake Test
Gently shake the egg to assess its freshness:
- Fresh Eggs: Will not make a noticeable noise when shaken.
- Older Eggs:May make a sloshing sound as the egg white becomes more liquid and the egg’s contents begin to separate.
5. The Egg Shell Test
Check the shell for any signs of aging:
- Fresh Eggs:Have a smooth, clean shell.
- Older Eggs:May have a rougher shell texture or visible cracks.
6. The Candling Method
Candling is a technique used to view the egg’s internal structure:
- Fresh Eggs: When held up to a bright light, the egg’s interior will appear relatively uniform with no dark spots.
- Older Eggs:May show visible air pockets, dark spots, or a more distinct shadow of the yolk.
Using these methods will help you accurately determine whether your eggs are fresh or older. Each method provides different insights into the egg’s condition, allowing you to choose the best eggs for your culinary needs.
Can I Use My Instant Pot to Make Hard or Soft Boiled Eggs?
Introduction
The Instant Pot is a versatile kitchen appliance that can simplify many cooking tasks, including making hard-boiled eggs. Using an Instant Pot can offer a hands-off approach to boiling eggs, and it often results in eggs that are easy to peel. Here’s how you can make perfect hard-boiled eggs using your Instant Pot.
1. Gather Your Ingredients and Equipment
You’ll need:
Fresh eggs
- 1 cup of water
- An Instant Pot
- A steam rack or trivet
- A bowl of ice water for cooling
2. Prepare the Instant Pot
Place the steam rack or trivet inside the Instant Pot. The rack helps keep the eggs elevated above the water to ensure even cooking.
3. Add Water
Pour 1 cup of water into the Instant Pot. This amount is sufficient to create the steam needed for cooking the eggs.
4. Arrange the Eggs
Gently place the eggs on the steam rack or trivet. You can cook up to a dozen eggs at once, depending on the size of your Instant Pot.
5. Set the Instant Pot
Close the lid of the Instant Pot and set the steam release valve to the sealing position. Select the “Pressure Cook” or “Manual” setting and adjust the timer to 5 minutes for medium eggs or 7 minutes for large eggs.
6. Natural Pressure Release
Once the cooking time is complete, let the Instant Pot release pressure naturally for 5 minutes. Afterward, carefully turn the steam release valve to the venting position to release any remaining pressure.
7. Cool the Eggs
Using tongs or a slotted spoon, transfer the eggs to a bowl of ice water. Allow them to cool for at least 5 minutes. This step stops the cooking process and makes peeling easier.
Using an Instant Pot to make hard-boiled eggs is a convenient method that delivers consistent results. The steam cooking technique ensures that the eggs are cooked evenly and are easy to peel, making this approach a great option for busy home cooks.
Conclusion
Mastering the art of cooking eggs to perfection, whether through hard-boiling or soft-boiling, enhances your culinary repertoire and allows you to enjoy a versatile ingredient in its best form. For hard-boiled eggs, achieving the perfect balance between cooking time and cooling methods ensures that you avoid common issues such as the green ring around the yolk and enjoy easy peeling. Utilizing modern appliances like the Instant Pot can streamline this process, offering convenience and consistent results.
On the other hand, soft-boiled eggs require precise timing to achieve a runny yolk with a firm white, perfect for enhancing a variety of dishes. Whether you’re preparing eggs for a hearty breakfast, a fresh salad, or a flavorful ramen bowl, understanding the nuances of cooking times and cooling methods will ensure your eggs turn out just right.
Determining the freshness of your eggs is crucial for both cooking methods. Utilizing simple tests like the water test, smell test, and appearance test can help you choose the best eggs for your recipes. Fresh eggs are ideal for dishes where texture is key, while slightly older eggs are often better for hard-boiling due to their easier peeling properties.
By following these guidelines, you can confidently prepare eggs to suit your culinary needs, making them a delicious and versatile component of your meals. Whether using traditional methods or modern appliances, these tips will help you achieve the best results every time. Read more
Your point of view caught my eye and was very interesting. Thanks. I have a question for you.